

Any system that is used to share files across a network can be incredibly valuable to a penetration tester. From finding usernames and passwords, to identifying configuration files that give insight into device configuration, file sharing protocols are potential treasure troves of information that should be explored.
Throughout my career as a penetration tester, I still have one standout test, where the security of the network was compromised within the first five minutes.
This was due to an unprotected NFS share holding an Excel spreadsheet that detailed usernames, passwords, and the specific authentication mechanism and location – meaning that I went from no access to suddenly having AD accounts, SSH accounts, web accounts, and a much better understanding of the potential places an attacker may focus their attention.
This is why NFS should always be tested if it is seen in a network.
What is NFS?
Network File System (NFS) is a protocol that allows remote file sharing between Linux and Unix systems.
It enables one system to mount a directory from another system as if it were a local drive, making file access and collaboration seamless.
However, misconfigured NFS shares can be a serious security risk, allowing unauthorised users to read or modify sensitive data, and can provide an avenue for full system compromise.
What is root squashing?
Before we jump into examples, let’s look at one of the most important settings to protect data in an NFS share.
When an NFS client accesses a shared directory, it does so with the permissions of the corresponding user ID (UID) on the server.
However, if an NFS client is running as root, it could potentially access or modify files that it shouldn’t.
By using root squashing, NFS maps the root user (UID 0) on the client to a lower-privileged user (typically nobody) on the server.
This prevents a remote root user from having full control over the shared files and increases security by restricting the files that can be accessed or changed.
Mounting an NFS share
To begin an attack, we first need to identify machines running NFS.
Since NFS runs on port 2049, once a target has been identified, it is possible to identify exported shares by using the showmount command:
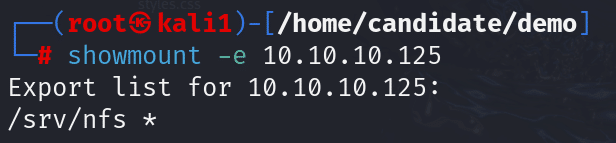
This lists the shares that can be mounted and whether there are any restrictions of who can mount them.
- /srv/nfs – this is the mountable share
- * – this shows that anyone can mount this share
UID matching in NFS
When we mount a share, NFS checks UIDs to make sure we have permission to read a file.
If the same UID exists on the client and server, we can read files as expected. However, if UIDs don’t match, we can find that we get permission errors.
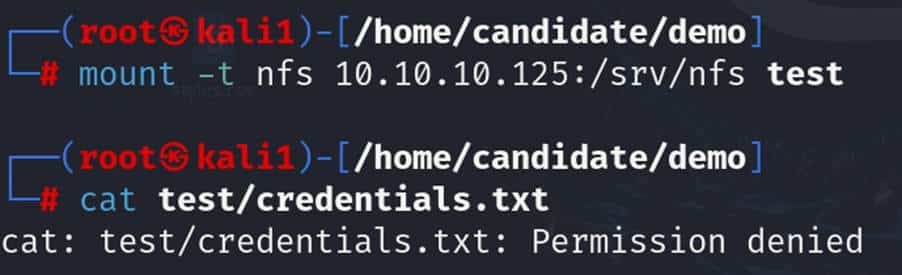
This is because only the user with UID 1001 has the permission to read/write the credentials.txt file as shown below:

To be able to read this file, we need a user with the UID of 1001 on the client machine (the one that has mounted the share).
This can be created by adding a user or modifying an existing user to have the same UID, and can be achieved by editing the /etc/passwd file where the user id is logged.

By changing user2’s UID to 1001, the UID values will match, and it is possible to open the credentials.txt file.

Entire filesystems accessible via NFS
A bigger security risk is when a system administrator mistakenly makes the entire file system available over NFS.
When this happens, not only is it possible to read all the files on the remote device, but it is also possible to write data that will allow us to log on to it.
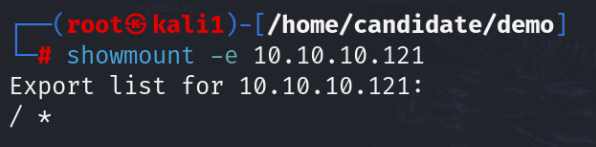
We can tell that the entire file system is exported because the of the /. This indicates the root directory which contains all the device files.
It is possible to mount the share in the exact same way as before

Gaining privileged access
Because the whole file system is exported, we can try to modify root files.
Our goal is to give ourselves an ability to log onto the computer. To do this, we can create an SSH key and add this to the ‘authorized_keys‘ file for root
What are SSH keys
SSH (Secure Shell) allows users to authenticate using passwords or SSH keys.
SSH keys are more secure because they use public-key cryptography. A public key is stored on the target system, and the corresponding private key is kept by the user. If the system sees a matching key pair, it grants access without needing a password.
Adding an SSH key
To add an SSH key, we need to generate the key pair
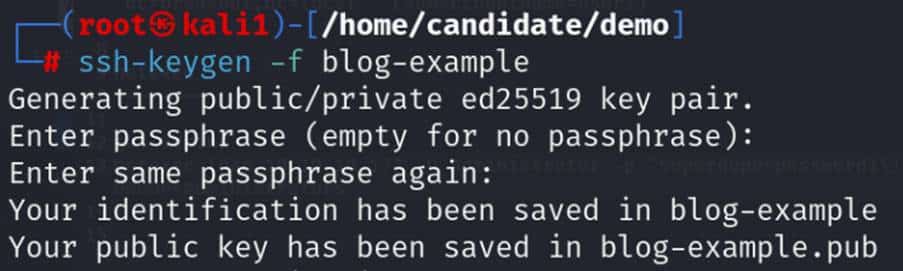
This has created two files: a private key called blog-example, and a public key called blog-example.pub.
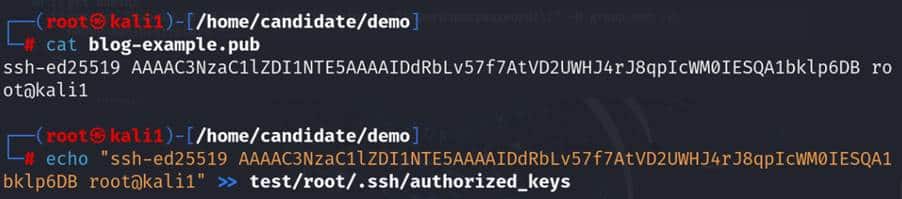
Adding a key to authorized_keys
If we can add our public key to the authorized_keys file (found at /root/.ssh/authorized_keys), we will be able to log on using our private key and without any need to use a password.
Logging onto the remote machine
Now that the remote device has our blog-example public key, we are able to log on using key-based authentication over SSH.

This means that the mistakenly exported filesystem has not only led to a loss of confidentiality of data on the remote machine, but now as pentesters, we are able to log onto the device and use it to our advantage.